
Poured concrete steps are a great way to make a durable yet impressive staircase that will lead guests into your home for years to come. Building them yourself is not only difficult, but also very labor intensive. On the other hand, it can save you quite a bit of money, making it worth doing for those with some experience working with concrete. If you want to embark on a challenge and take on such a project, we have a beginner’s guide that will teach you everything you need to know about pouring concrete steps.
Learn the lingo
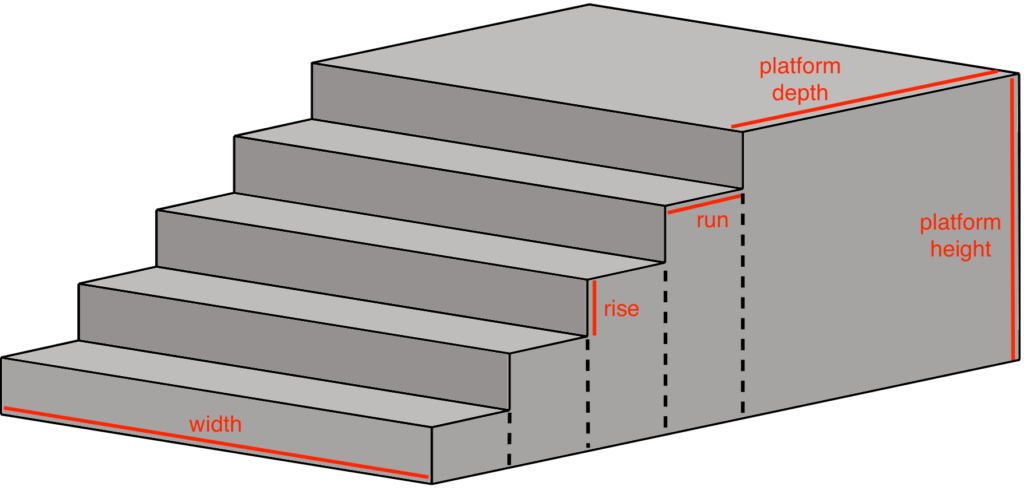
There are two main parts to each concrete step: a riser, or the vertical portion of the step, and the tread, the horizontal part that people step on. It is important to know several other terms before you begin your project.
- The Pitch Line is an imaginary line running from the nose of the stair on the bottom to the nose of the top stair. The angle that is created between the bottom of the stairs and the pitch line is referred to as the pitch.
- The rise is the height of the complete staircase, beginning at the base and ending with the topmost stair.
- The depth of a stair, from the front of the staircase to the back, is referred to as the run.
- The side supports on either side of a stair is known as the stringers. It is important to pay attention to the measurements of these, as they will be used when creating your concrete forms.
Consider measurements
The first step in building your own poured concrete steps is to find the complete rise of the stairs, which can be done by measuring the complete height. Once you have that number, you will need to figure out the run of the stairs by measuring the distance between the planned front and back of each stair. Lastly, the width of your stairs is needed. This can be found through a measurement of the distance that is created between the planned left and right sides of your staircase.
How many stairs do you need?
After you find the total rise of your planned staircase you can easily determine how many stairs you will need altogether by taking that number and dividing it by the riser height, or how tall each individual step is. If the final number includes a decimal, you are required to use the next whole number by rounding up.
Typically, risers are somewhere between six and eight inches. It is important to check the building codes in your state, as some do state that the height of the riser can be no more than 8.25 inches.
Most likely you will need to have an equal number of risers and treads. This will not be the case if your top tread is one step below the level that you are building to. In that case, you will need one less tread than your total number of risers.
Time to do some math
Once you know how many stairs you will be creating, you will need to find both the height of each tread as well as the depth, in addition to the height of your risers. Standard treads are around 11 inches in order to accommodate both small and large feet. The riser’s height can be found by dividing the entire height of your staircase by the total number of risers.
Last, you will need to determine the total length of your stringers. This involves a bit more work. First, take the number of the total rise and multiply it by that same number, then multiply the total run by that same number. After, add those two numbers together and then take the square root of that number. Lastly, you will need to take the inverse sine (sin-1) of your total rise divided by the length of your stringers.
Do you need handrails?
It is important to consider handrails before you begin, as brackets may have to be installed into the concrete as it is poured. However, if your stairs are going to be next to a wall, a handrail could always be installed later on.
Time to begin
Now that you are ready to begin, the first step is to stake out the area your steps will be located. Do this by placing wooden stakes into the ground at the base of the stairs, marking each corner. Make sure to measure as you go to ensure everything is correctly laid out.
Next, the excavation process will begin. You will need to take a shovel and dig between four and eight inches below the ground in order to clear away any rocks or tree roots that may be laying where you will be pouring the concrete. If you have ever considered building your own house from scratch, consider this step advanced practice.
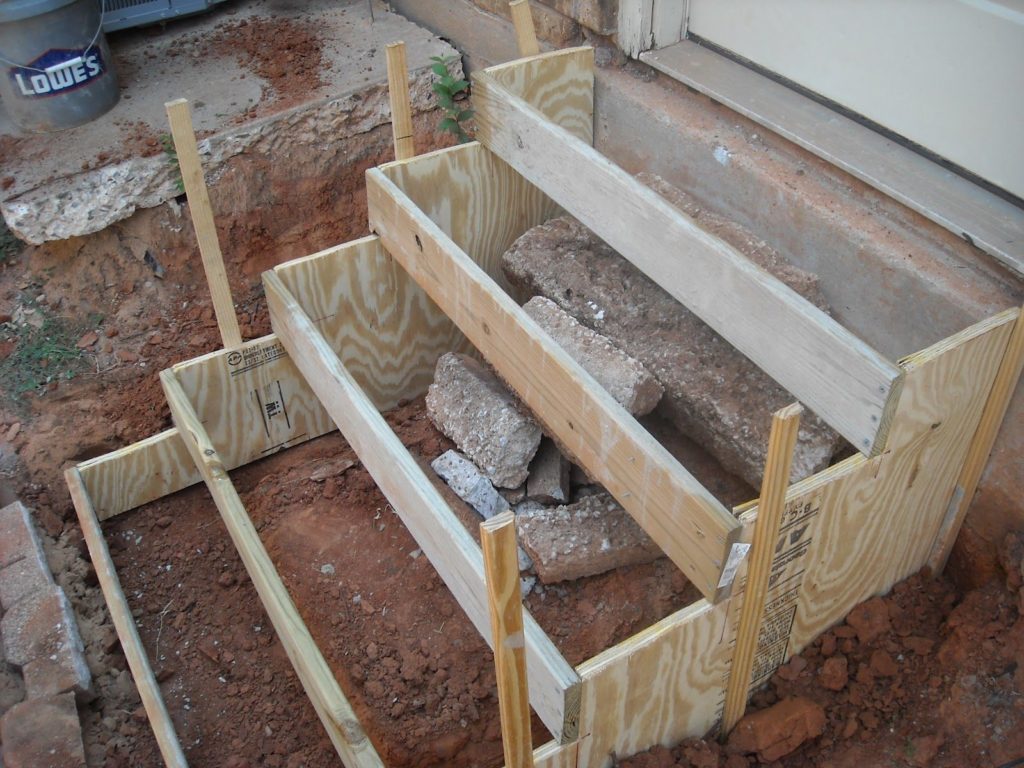
Build your form
Take the dimensions you found earlier for your staircase and use them to create a wooden form outlining how your stairs will look.
Pour, pour, pour!
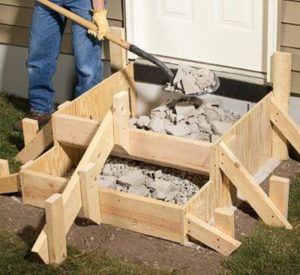
You will need to begin by laying a subbase of some sort of granular fill such as open-grade stone. This is done to protect the stairs from movements in the Earth or any sort of deterioration. Once you have done that, you can place your form on top and use a level to make sure it is not sloping off to one side or the other.
You are now ready to mix your concrete and pour it into the form! Make sure to use a good cement mixer and a trowel to flatten and smooth the concrete as you work.
While you should always look at the directions on the concrete you purchased, it typically takes about 28 days for concrete to completely cure, although your form should be able to be removed after the first full 24 hours.
We would love to hear from you. If you have any comments or tips, feel free to leave them below.


![What to with Scrap Metal? [infographic]?](https://facts-homes.com/wp-content/uploads/2019/07/645413-POPYOV-391-120x86.jpg)


This post is really good! Thanks for sharing it!
I have a technical question. I get everything, but on the last image there is a guy with a shovel and he’s filling the steps with some debris. Why would you do that? Is it to save how much concrete you need or why?
I didn’t really get this bit, but I think it’s crucial to understand what’s to do with this stuff: “This is done to protect the stairs from movements in the Earth or any sort of deterioration”.
Hi Markus,
Thanks for your comment, and I’ll try to answer your question.
After you excavated the space and removed any foreign objects that could interfere with your concrete pouring (like trees,grass, or rocks) then you will want to lay what it’s called a subbase before pouring the concrete.
You don’t want to pour directly so much concrete, since it’s a weaker material so if it cracks (which can happen for various reasons, like earth movements, small earthquakes, or etc.) you don’t want the whole integrity of your stairs to be compromised.
The subbase (which is what the image illustrates) can be anything more solid and sturdy (open grade stones are usually used) that you lay your concrete on top of. Sometimes people even use a wire mesh. The idea is to reinforce the concrete, so even if it cracks, the solid subbase can hold the structure in one piece.
It’s not about saving concrete, but building a stronger foundation for your stairs.